If you decide to make a personalized ruler growth chart like mine (click to see post), you may ask yourself, "How do I hang this!?" This post will give you step by step instructions to hang your homemade growth chart. It's very easy, but does require some precision. Before you get started, gather the following supplies:
- A D-Ring Picture Frame Hanger (I found mine at Hobby Lobby in the framing department, $2.99/2-pack...use a 40% off coupon!)
- A Measuring Tape
- Blue Painter's Tape (Optional)
- A Pencil
- A sturdy nail (or screw) for the wall
- A handheld drill with bits
- Sticky tack (optional, to secure the bottom of the ruler to the wall so kids don't try to move it)
STEP 1
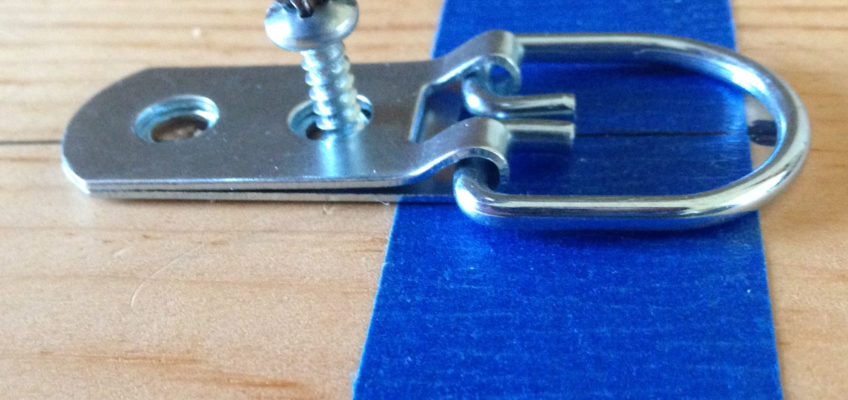
Gather all of your supplies. Then, decide at what height you will hang your chart. I found that 5'6" is a good height to attach a D-ring hook. To help guide my measurements, I wrapped painter's tape 1/16" below the 5'6" mark. This helped me draw a circle at 5'6", exactly where the nail on the wall needed to be. I made a mark in the center of the board (4.75" from each side on my board).
'
STEP 2
I made the centered mark into a circle at exactly 5 feet 6 inches. It is very important. Your circle needs to be at exactly 5'6" because you will measure 5'6" from the bottom of the wall to hammer in your nail. I would also suggest that you draw a circle that is exactly the same diameter as the nail or screw you use on the wall. You cannot forget to account for the diameter of the nail when you attach your D-ring hook to the growth chart. You need to make sure your D-ring hook lays right above the top edge of the nail. If you measure incorrectly from the nail mark, your growth chart could be just fractions of an inch off!
STEP 3
Draw a vertical line from your circle down the center of the board. This will help you line up the holes on your D-ring hook.
STEP 4
Lay your D-ring hook onto the wood. The inside of the D-ring should be placed on the outer edge of the circle you drew. Since the circle represents the nail's diameter, you need to make sure your hook sits on top of the nail, which is measured to exactly 5'6".
STEP 5
Trace the inside of each hole on the D-ring hook. These will help guide you as you drill pilot holes.
STEP 6
Drill shallow pilot holes inside the circles. Make sure you don't drill too far, you don't want to drill through the front of your growth chart!
STEP 7
Drill the screws in place. Your D-ring hook should be very secure.. Measure again to make sure your hook will hang on a nail placed at 5'6". If you pull up on the D-ring and it extends even a fraction of an inch above the circle you drew, you need to make sure you hammer your nail into the wall 5'6" plus the extra fraction of an inch. Make sure to adjust for your new measurements if they've changed!
STEP 8
Measure 5'6" (or your new measurement) up from the bottom of your wall. I can't stress it enought...when measuring in previous steps, make sure the TOP of the nail's diameter will rest exactly on the bottom of the inside edge of the D-ring.
That's it! You've successfully hung your growth chart! Use sticky tack (or other adhesive) to adhere the bottom of the chart to the wall. You don't want your small children to move it around.


Nicole
This is awesome! I made a growth chart just like this for my daughter without thinking how I was going to hang it. I haven’t don’t have it hung yet but I don’t think I will have a problem with your directions. Thank you!
Josh
If you put your book at 5’6” and then measure from the floor up 5’6” the board will not be lifted off the ground. What did you do to get it like that
Josh
Nvm I forgot I thought you meant measuring 5’6” from the bottom of the wood. I didn’t realize you meant the actual mark on the board. Sorry about that
Erika Kao
This was really helpful. I never would have thought of a D-ring hook.
Thanks for putting this together!